Saturday, February 28, 2015

Switch it Up Saturday- What's In the Fridge?

     So many things change when you start eating healthier.  When I dieted after my third pregnancy I learned that if I did not want to eat something, I better not have it in the house.  If I had to drive a few miles to go get something I should not be eating, then I was less likely to eat it.

     This is my refrigerator at the moment.  The Walmart grocery bag has chicken legs I bought at a marked down price *fist pump*.  The purple lidded container is full of peeled carrots (my eight year old's daily task- we eat a lot of carrots).  The yellow carton of eggs is from our chickens; the other carton is organic from the store.  On the bottom shelf, in the back, are two half gallon jars of chicken bone broth.  In the refrigerator drawers we have cabbage and carrots (winter staples).  In the door I have wine, yogurt, butter, organic steak sauce (my husband brought this home, it is unopened), organic ketchup (my husbands), fish oil (orange flavor), organic mustard, filtered water, cold coffee, and beer.


     This does not phase me.  I did not even realize my refrigerator contents had changed all that much, until my mother came to live with me for six months.  She was really surprised at the lack of food in my refrigerator.  So surprised, in fact, that she web cam-ed her sister, and made a point to show her my refrigerator.

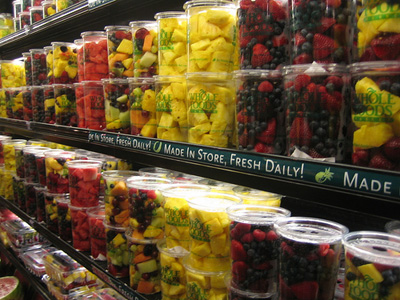
     When you eat unprocessed foods, you can not have too much on hand at once, or you risk some things spoiling.  My refrigerator looked a lot like this one, before I started GAPS.


     I believe the refrigerator I grew up with looked similar to this, as well.  When I went looking for pictures of refrigerators I was shocked.  I had forgotten how mine use to look.  Now, I want to stop a second to let you all know that I do not go into peoples houses and judge them by the contents of their refrigerator.  And I would also like to add that it is not what you eat every once in a while, but what you eat all the time that matters.  Processed foods have long shelf lives, compared to unprocessed foods.  


     In the summer my refrigerator looks a lot like this one.


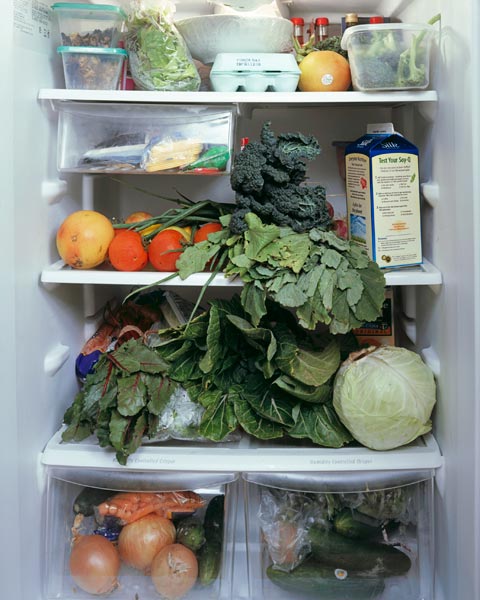
     I have all kinds of things from my garden I pack in there.  I have to be careful I do not forget about things, or they will go bad.  I use my freezer a lot for storing vegetables for the winter.  I do can, a bit.  Canning is technically processing food.  When you can at home you avoid preservatives generally found in canned foods.  I do buy organic canned tomato products.  A fresh from the garden tomato is a better choice, but not always an option, especially up here in the North.  

     What kinds of foods we eat is a choice we all make for ourselves and maybe our families.  There is so much information out there telling us what is good, and what is "bad".  I get really overwhelmed by this.  I have found a rule of thumb that helps me navigate the information available out there.  How natural is it?  

     God created this world, and I have found that the more simple, natural, whole the food is, the better my family feels.  Again, it is not what you eat once in awhile, but what you eat all the time that is going to affect you.

     Another important thing I want to mention is switching from a traditional American diet, to a unprocessed/whole food diet.  You may not do well.  Back when I was dieting after my third kid, I started to switch all our grains to whole grains.  I was on a roll, pasta, bread, cereal, you name it, if they made it whole grain, I switched over.  Unfortunately, this did not have the desired affect.  Our guts were just not able to hand the whole grains after years of not ever eating them.  This is when I first realized that my son (at the time one year old) and my husband had a gluten allergy.  The whole grain was very hard to digest for them.

     Instead of switching from a traditional American diet right into a more whole food diet, I would suggest Paleo, at least for a little bit.  Paleo is a no grain, whole food diet.  Many people who have health issues have found relief from the diet.  Or, I would suggest taking it slow, switching a few foods at a time.  Most of all I would highly recommend GAPS, especially if you have digestive problems of any form.

     Whatever you end up eating, remember that you are what you eat.  

Wednesday, February 25, 2015

Whatever Wednesdays- "Apple Stuff"

     Quite often it will be close to bed time and I will suddenly realize I do not have a clue as to what I will be making for breakfast the next morning.  At times like these I often turn to my freezer.  On this particular day I found a bag of peeled and cored apple sections! 

     I live across the street from a while apple orchard.  They are everywhere up here.  (Thank you, Johnny Appleseed?)  This particular year (2013) was a great apple harvest.  I had so many apples.  I dehydrated them in thin slices and the kids ate them like raisins.  I made quarts and quarts of apple sauce.  Due to the time consuming aspect of making the apples ready for apple pies I only put a few bags of peeled, cored and sectioned apples away in  my freezer.  And then promptly forgot about them.  I was worried they would not taste very good due to the fact they were a year and a half old, but although they were rubbery when I defrosted them, the kids really liked them.

Apple Stuff

Things you will need:
9x13 baking dish
butter or animal fat (to grease the dish)
about 5 to 6 cups of apples, peeled and cored, cut into quarters or sections
4 cups of almonds, ground into a meal like consistency
3 eggs
1/2 cup of coconut milk, yogurt or raw milk (your choice)
1/2 cup of honey or maple syrup (and a bit extra for drizzling)
about 1 or 2 teaspoons of cinnamon

Directions:
1. Place the butter or animal fat in the 9x13 baking dish and place in the oven.

2. When the butter or animal fat has melted, pull the baking dish out of the oven and smear the butter or animal fat around the dish.

3. Pour the apples into the baking dish.  (Since I used frozen apples, I defrosted them first, in the refrigerator, and then dumped them into a colander in the sink and let any liquid strain out.)


4. Sprinkle with cinnamon and drizzle with honey (to your personal taste).

5. In a stand mixer or a big bowl combine almond meal, eggs, milk or yogurt, honey or maple syrup and cinnamon.


6. Pour mixture over apples.  This may be more like spread, depending on your measurements and whether you used honey or maple syrup or yogurt verses milk.  It will be sticky, and may be hard to spread if it is too thick.  Just add more of any of the liquid ingredients, if this is the case.

7. Place in the oven at 375 degrees for an hour, and then check to see if the top is done in the middle.  If it is not, cook for another half hour.


     Sorry I do not have a finished picture for you.  I forgot to take one, and the kids loved it and gobbled it down.  I ended up making it four days in a row.  I had to start it cooking at 6:30 am so it was ready by 8 am, for breakfast.  You could cook it the day before and eat it at room temperature or cold.

     I love it when I have success at just throwing things together that I happen to have on hand.  It does not always come out this well!

Apple picking is so awesome!  It is hard to get me out of the tree.

Thursday, February 19, 2015

Stage 2- Yes! Egg Yolks!


     I hate cooked egg yolks.  There is a little tidbit about Katie; something you never cared to know, but now you do.  Lucky you.  The other tidbit I will give you is I LOVE RAW EGG YOLKS!  Seriously!  My husband is the master egg maker, and he makes me sunny side up eggs that really make me feel sunshiny!  (That must be a word, because my chrome dictionary said so.)

     The key to this next stage, Stage 2, is to remember to take it slow.  The second time my family and I did Intro I forgot this important fact, far to often.  It is so tempting to jump in with both feet.  My brain has a mental list going of "allowed foods", and on to the list I plunk "egg yolks".  But, really, I am just trying them on for size, one foot at a time.  In the beginning I use to think that was in case we were allergic or something.  Now I realize that our guts are fragile things right now.  Mentally picture your gut before you started Intro (or for those of you who have not started Intro, think of your gut right now).  If you have read any of Dr. Campbell-McBride's book Gut And Psychology Syndrome Diet, you may be imagining a very damaged, leaky gut, over grown with bad bacteria.  If you have completed Stage 1, there is some level of healing, though it is not complete.  Your "leaky gut" may have sealed up, but your villi are still weak and in need of healing.
I am using this picture, even though I am not talking about Celiac Disease, because Celiac Disease is not the only reason for damaged villi, it is one of many.  I thought the picture was appropriate for my purposes.
 It takes a lot of time for your villi, the little nutrient absorbing "fingers", to heal.
 Adding a  lot of a new food can kind of freak out your digestive system, as a whole.  Proceeding through the stages slowly is key.  Believe me, a woman who has experienced this twice before, if you go too fast, you end up taking more time in the long run.  If you over do it, you have to step back and basically pause your progress for a few days, until you are able to try again.  This is one of the main reasons my kids took six months to make it through Intro, and not six weeks.

     Another thing to remember, as you progress on to the next stage, is not to forsake your healing foods: broth, probiotics and good fats.  These three things are key to helping your gut regenerate the villi and quickly get your gut back to a healthy state.  The more of those three things you can consume, the more quickly you will heal.  In fact, for those of you who are not on GAPS Diet, but maybe are just reading this out of curiosity, those three things: broth, probiotics and good fats, are key to a healthy gut which leads to a healthy immune system.  Back in November my kids started getting sick, constantly.  I realized I had started to forsake the broth.  I made soup every few days, but they were not drinking plain broth anymore.  Since I started Intro, I have been making my kids drink a cup of broth every morning before breakfast (most days).  They have not gotten sick since (except for the three year old, she has gotten a few colds, but no one else has gotten it from her)!

     So....here is the Stage 2 list of allowed foods.  Proceed slowly, remembering your goal is total gut healing.

STAGE 2

Everything from Stage 1
-Homemade meat or fish broth
-Homemade soup
-Meat and vegetables that have been boiled and cooked thoroughly
-Homemade yogurt or kefir (in soups and broth, if tolerated)
-Juice from your homemade sauerkraut, fermented vegetables or vegetable medley
-Ginger tea with a little honey

Add raw organic egg yolks.

First try one egg yolk in one bowl of soup.  Then, if you handle that well, continue adding them to each bowl of soup.  When you think you are handling them just fine, make yourself a soft boiled egg (YUM).  (Soft boiled egg "how to" below.)  If that goes over well, then you can eat as many soft boiled eggs a day as you want.  And if you are like me, this will be a sweet and welcome change!

Add roasts made with meats and vegetables.

Dr. Campbell-McBride actually calls these "casseroles".  This was quite confusing to me at first.  To me, a casserole has pasta and cheese in it, or maybe rice and tuna; but never water.  What this stage allows for is meat and vegetables cooked in water, in the oven.  A tried and true way of mine to do this is as follows:
1. Place whole chicken (or any other piece of meat, but chicken is the best, in my opinion) in a large baking dish, deep enough to submerge the chicken in water.
2. Fill with water and add a generous amount of salt and crushed pepper, along with any fresh herbs (I love rosemary).
3. Cook, uncovered, at 375 degrees for 1 hour.
4. Remove from oven, add thinly sliced zucchini to the dish, pushing them down into what is now broth, around the chicken.  
5. Cover with foil and cook for an additional thirty minutes to an hour, checking the temperature of the chicken to determine if it is fully cooked.

Introduce fermented fish or Gravlax.
If you want to....me, I do not.  I have entertained the idea a few times, but the more I look into it the more unnecessary it seems.  I am sure the added probiotics would be great, but I have a few reasons I do not add this step in.
1. Gravlax you can buy has sugar in it.  Gravlax I could make.....


Well, let us just say I do not think I will be able to bury any fish in the ground any time soon.
2. Fish is something I am able to eat on Stage 1.  The only difference is I can have a different flavor or way of eating it.
3. I can not get local fish very easily, or inexpensively, and to buy it already fermented or packaged seems to go against the main goals of the diet, eating natural, unprocessed foods.
For those three reasons I choose to ignore this step, and it has not seemed to cause any ill affect.  But, if you are looking for something different and exciting, feel free to try it.  Just beware of extra ingredients if you are purchasing it from the store.

Introduce homemade ghee.

Ghee is pretty good.  Introduce it a teaspoon at a time.  The biggest temptation I have is not eating the milk fat that kind of crisps up.  I went looking for a recipe to share and only found ones that call for making it on the stove.  I have never made it on the stove, but see everydaymaven.com for the recipe.  I might have to try it this way, it looks easy.  When I make it, I make it in the oven.

GHEE
1. Preheat oven to 250 degrees.
2. Place butter in baking dish.
3. Let butter melt for 90 minutes.  The milk solids will rise to the top and then sink to the bottom (or do one or the other).  
4. Remove from oven and strain.
Beware of white  liquid.  I have "cooked" the butter for the allotted time, and still not been able to strain it.  Worrying that I would ruin the whole thing, I have removed it all, and placed the whole thing (dish and all) into the fridge.  When it cooled, I have plopped it out of the dish, upside down, and wiped off the white liquid (milk solids?).  Maybe I did something wrong, but it ended up working alright.

SOFT BOILED EGG
1. Heat a small pan of water on the stove.
2. When water is boiling place eggs in pan, lowering them down in the water with a spoon.
3. Set timer for six minutes (seven minutes if you are doing more than five eggs).
4. When timer goes off, remove eggs and place in a bowl.  Run cold water over the eggs to stop the cooking.
5. Peel the top half to one inch off the top of the egg and then, using a small spoon, scoop out the egg and place it in a bowl.  Immediately break open the egg, making sure the yolk is burst, so it will not cook.
The last two steps need to be done quickly, so insure the egg yolk does not cook.  If you can time it right, your egg whites will be fully cooked and your egg yolk will be nice and runny.  If you find that six minutes is a bit long, or maybe not enough, adjust the time in thirty second increments.


Friday, February 13, 2015

No Time For Soup- GAPS!

This makes me smile.
   
     For the last two weeks I have been under an extreme amount of stress- a three year project coming to completion. With all my time being spent on painting, rearranging, unpacking and cleaning, when was I supposed to cook and eat?  I simply had no time to make soup.  Looking back over the two weeks I am amazed I ate anything at all, and if it was not for my die hard commitment to stay on Intro until I completed it, I would have stopped and gone back to eating what was in the house, or what I could get to the house with a phone call.

     This lead me to think about ways I fail.  No one sets out to fail.  No one makes a plan and includes, "and then quit completely, and admit failure".  We all plan to succeed at whatever we start out to do.  Our goals are optimistic and maybe even lofty.  Anyone who sets goals for themselves is shooting for the stars, not planning to quit and admit defeat.  So what separates the finishers from the quitters?  Why am I still on Intro, instead of eating a Jimmy John's sandwich.  Here are five reasons not to quit.

Five Reasons Not To Quit

1. Remember why you started.  Why did you start in the first place?  What has changed, except your temptations and resolve?  Do you still want your goal?  I started GAPS because I want to heal my gut.  I started GAPS because I believe this is the path that God wants me on.  I am doing Intro because it is a healthy choice for my body.  Nothing has changed, I still want to finish this diet, and I still believe I can do it.

2. It is hard, but you are strong.  What you are going through is tough; it is hard.  The fact is, though, you are strong.  You are capable.  You can do it.  Period.  I did not quit because I told myself I could do it.

3. This is not forever.  It is going to end.  Life will go on.  Whatever you are facing will not last forever.  Endurance and perseverance will pay off.  Hang in there.

4. You want that reward.  I have promised  myself a trip to see my best friend if I see this diet to the end.  This reward is twofold.  First, I want the reward, and I am able to fight off temptation a little bit better because I have a trump card in my back pocket (i.e. seeing my best friend trumps eating a pumpkin pancake).  Second, because I have told my best friend that I get to drop everything and come see her if I can stick to this diet, I now have a level of accountability as well, and the reward is for her too (not that I think so highly of myself that I would consider her seeing me as a reward for her, but I know that she wants me to come see her, thus it is good for her too).

5. You are believing a lie.  This is the biggest reason not to quit.  What ever is tempting you to quit has a lie that goes with it.  For example, I am tempted to eat the mashed potatoes I just made my kids.  Why?  Because I told myself that there is nothing else to eat that is easy, or ready.  That is the lie.  I have broth and broccoli, and I can quickly boil the broccoli and have "soup".  I just need to think out of the box, and remember the other four reasons not to quit.

     I did a lot of thinking outside the box these past two weeks.  Not having soup on hand did not throw off my progress on Intro.  Over the course of the two weeks I used broccoli, cauliflower and green beans in a similar fashion.  After cooking a whole chicken in a crock pot, I took the broth and boiled my vegetable of choice in it.  I used salt and pepper, and it was delicious.  It was actually a nice break from soup.  If I had to pick one, I actually preferred the one vegetable cooked in broth to a melody in soup.  With the green beans I added garlic.  It was so good!

     It all paid off.  I am now on Stage 3!  If I had given in to temptations and lies I would be starting over, now that the stress is over, on Stage 1 again.  That is what I have to remember, and hang on to when temptations come at me.  WILL POWER!