
I hate cooked egg yolks. There is a little tidbit about Katie; something you never cared to know, but now you do. Lucky you. The other tidbit I will give you is I LOVE RAW EGG YOLKS! Seriously! My husband is the master egg maker, and he makes me sunny side up eggs that really make me feel sunshiny! (That must be a word, because my chrome dictionary said so.)
The key to this next stage, Stage 2, is to remember to take it slow. The second time my family and I did Intro I forgot this important fact, far to often. It is so tempting to jump in with both feet. My brain has a mental list going of "allowed foods", and on to the list I plunk "egg yolks". But, really, I am just trying them on for size, one foot at a time. In the beginning I use to think that was in case we were allergic or something. Now I realize that our guts are fragile things right now. Mentally picture your gut before you started Intro (or for those of you who have not started Intro, think of your gut right now). If you have read any of Dr. Campbell-McBride's book Gut And Psychology Syndrome Diet, you may be imagining a very damaged, leaky gut, over grown with bad bacteria. If you have completed Stage 1, there is some level of healing, though it is not complete. Your "leaky gut" may have sealed up, but your villi are still weak and in need of healing.
 |
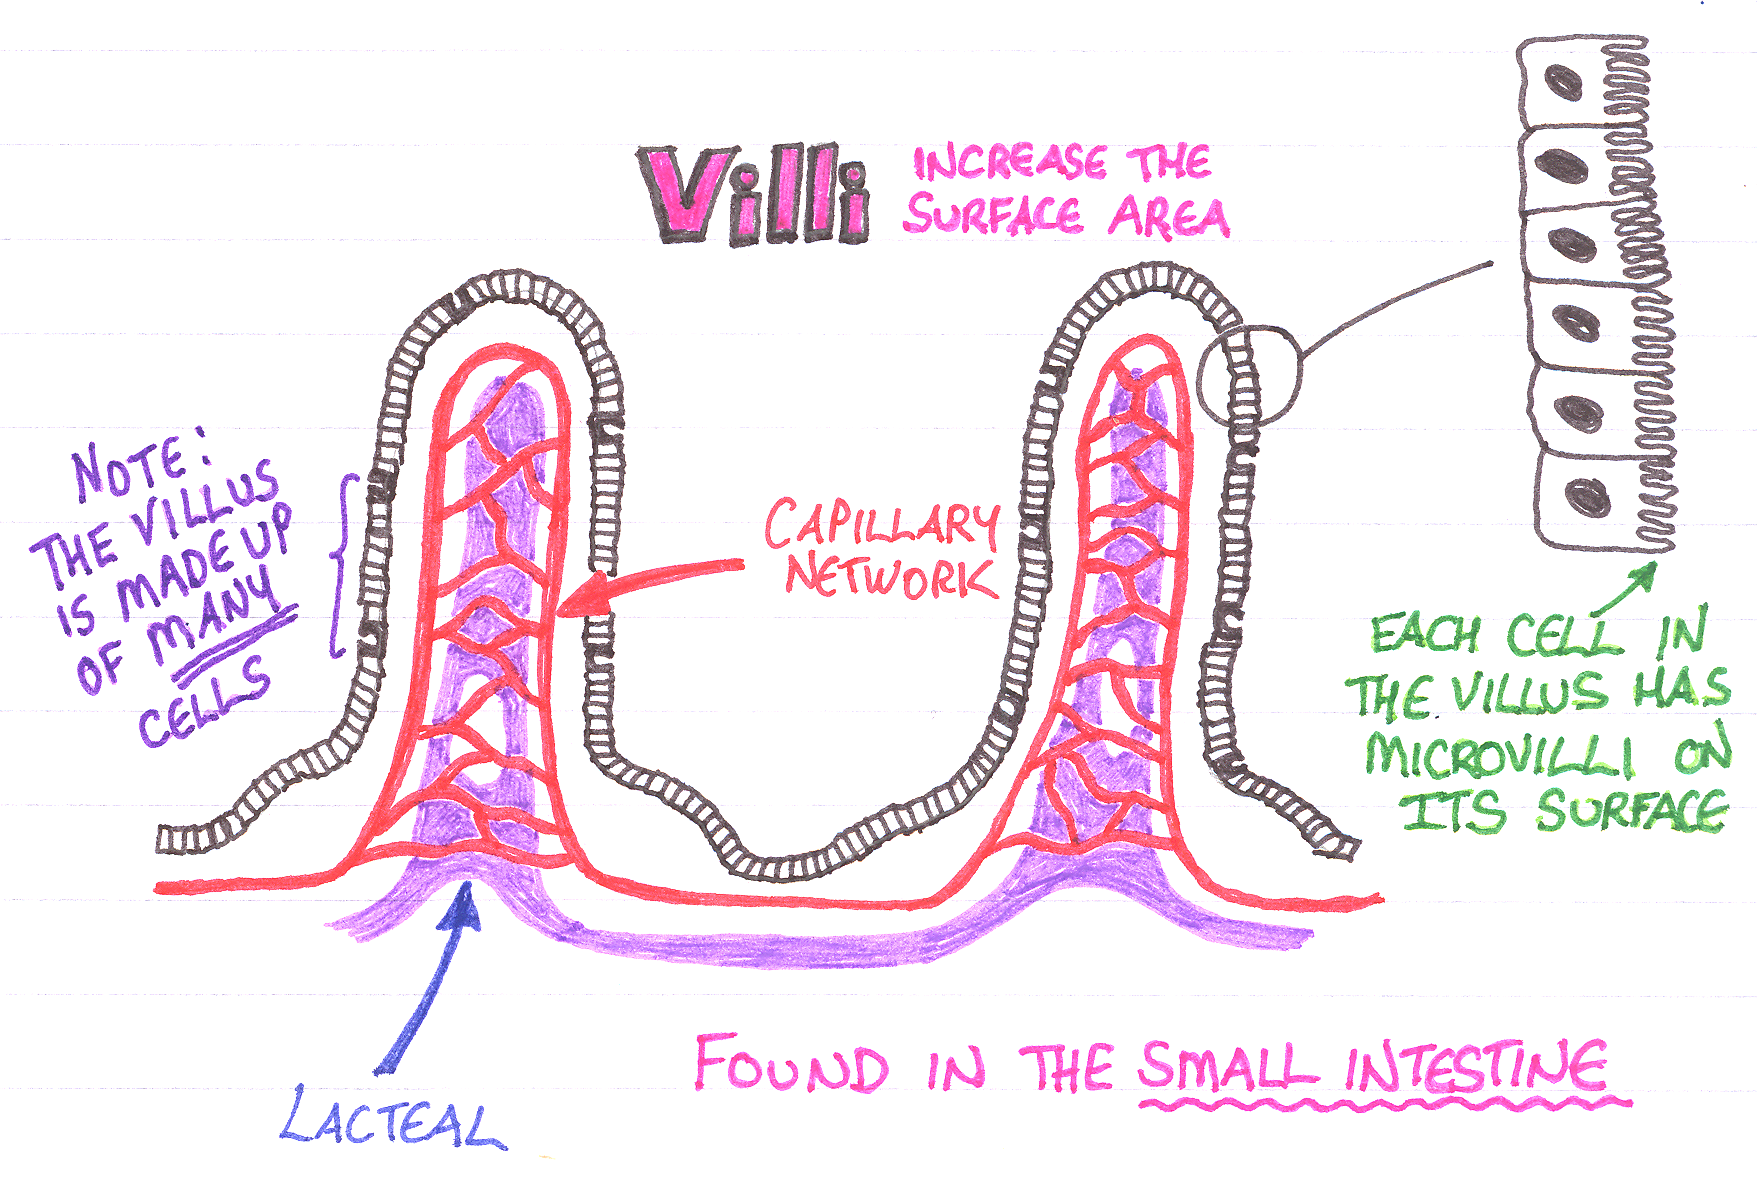
| I am using this picture, even though I am not talking about Celiac Disease, because Celiac Disease is not the only reason for damaged villi, it is one of many. I thought the picture was appropriate for my purposes. |
Another thing to remember, as you progress on to the next stage, is not to forsake your healing foods: broth, probiotics and good fats. These three things are key to helping your gut regenerate the villi and quickly get your gut back to a healthy state. The more of those three things you can consume, the more quickly you will heal. In fact, for those of you who are not on GAPS Diet, but maybe are just reading this out of curiosity, those three things: broth, probiotics and good fats, are key to a healthy gut which leads to a healthy immune system. Back in November my kids started getting sick, constantly. I realized I had started to forsake the broth. I made soup every few days, but they were not drinking plain broth anymore. Since I started Intro, I have been making my kids drink a cup of broth every morning before breakfast (most days). They have not gotten sick since (except for the three year old, she has gotten a few colds, but no one else has gotten it from her)!
So....here is the Stage 2 list of allowed foods. Proceed slowly, remembering your goal is total gut healing.
STAGE 2
Everything from Stage 1
-Homemade meat or fish broth
-Homemade soup
-Meat and vegetables that have been boiled and cooked thoroughly
-Homemade yogurt or kefir (in soups and broth, if tolerated)
-Juice from your homemade sauerkraut, fermented vegetables or vegetable medley
-Ginger tea with a little honey
Add raw organic egg yolks.
First try one egg yolk in one bowl of soup. Then, if you handle that well, continue adding them to each bowl of soup. When you think you are handling them just fine, make yourself a soft boiled egg (YUM). (Soft boiled egg "how to" below.) If that goes over well, then you can eat as many soft boiled eggs a day as you want. And if you are like me, this will be a sweet and welcome change!
Add roasts made with meats and vegetables.
Dr. Campbell-McBride actually calls these "casseroles". This was quite confusing to me at first. To me, a casserole has pasta and cheese in it, or maybe rice and tuna; but never water. What this stage allows for is meat and vegetables cooked in water, in the oven. A tried and true way of mine to do this is as follows:
1. Place whole chicken (or any other piece of meat, but chicken is the best, in my opinion) in a large baking dish, deep enough to submerge the chicken in water.
2. Fill with water and add a generous amount of salt and crushed pepper, along with any fresh herbs (I love rosemary).
3. Cook, uncovered, at 375 degrees for 1 hour.
4. Remove from oven, add thinly sliced zucchini to the dish, pushing them down into what is now broth, around the chicken.
5. Cover with foil and cook for an additional thirty minutes to an hour, checking the temperature of the chicken to determine if it is fully cooked.
Introduce fermented fish or Gravlax.
If you want to....me, I do not. I have entertained the idea a few times, but the more I look into it the more unnecessary it seems. I am sure the added probiotics would be great, but I have a few reasons I do not add this step in.
1. Gravlax you can buy has sugar in it. Gravlax I could make.....

Well, let us just say I do not think I will be able to bury any fish in the ground any time soon.
2. Fish is something I am able to eat on Stage 1. The only difference is I can have a different flavor or way of eating it.
3. I can not get local fish very easily, or inexpensively, and to buy it already fermented or packaged seems to go against the main goals of the diet, eating natural, unprocessed foods.
For those three reasons I choose to ignore this step, and it has not seemed to cause any ill affect. But, if you are looking for something different and exciting, feel free to try it. Just beware of extra ingredients if you are purchasing it from the store.
Introduce homemade ghee.
Ghee is pretty good. Introduce it a teaspoon at a time. The biggest temptation I have is not eating the milk fat that kind of crisps up. I went looking for a recipe to share and only found ones that call for making it on the stove. I have never made it on the stove, but see everydaymaven.com for the recipe. I might have to try it this way, it looks easy. When I make it, I make it in the oven.
GHEE
1. Preheat oven to 250 degrees.
2. Place butter in baking dish.
3. Let butter melt for 90 minutes. The milk solids will rise to the top and then sink to the bottom (or do one or the other).
4. Remove from oven and strain.
Beware of white liquid. I have "cooked" the butter for the allotted time, and still not been able to strain it. Worrying that I would ruin the whole thing, I have removed it all, and placed the whole thing (dish and all) into the fridge. When it cooled, I have plopped it out of the dish, upside down, and wiped off the white liquid (milk solids?). Maybe I did something wrong, but it ended up working alright.
SOFT BOILED EGG
1. Heat a small pan of water on the stove.
2. When water is boiling place eggs in pan, lowering them down in the water with a spoon.
3. Set timer for six minutes (seven minutes if you are doing more than five eggs).
4. When timer goes off, remove eggs and place in a bowl. Run cold water over the eggs to stop the cooking.
5. Peel the top half to one inch off the top of the egg and then, using a small spoon, scoop out the egg and place it in a bowl. Immediately break open the egg, making sure the yolk is burst, so it will not cook.
The last two steps need to be done quickly, so insure the egg yolk does not cook. If you can time it right, your egg whites will be fully cooked and your egg yolk will be nice and runny. If you find that six minutes is a bit long, or maybe not enough, adjust the time in thirty second increments.
No comments:
Post a Comment